ai.testiv/mcp
Local-first visual regression for AI agents: verdicts, diff images, explain_snapshot. No API key.
TestivAI Open Source




Local-first visual regression testing SDKs for modern web applications.
This is the home of TestivAI. It contains everything you need to capture, diff, and report visual regressions fully locally — MIT-licensed, no account, no server.
See a live report → — a real TestivAI OSS report rendered in your browser, straight from CI. No install, no signup.
Why TestivAI?
Pixel-only visual testing drowns you in false positives — a font re-hint or an anti-aliasing shift across machines lights up as a "change," and you spend your time re-approving noise.
TestivAI pairs every screenshot with a snapshot of the page DOM. When pixels differ but the DOM is structurally identical, the report flags the diff as likely render noise instead of crying wolf. When the DOM actually changed, you see exactly what (2 added, 1 removed). That single signal is the difference between a flaky test wall and a report you trust.
- Fully local, no account — captures, diffs, and a self-contained HTML report all stay on your machine.
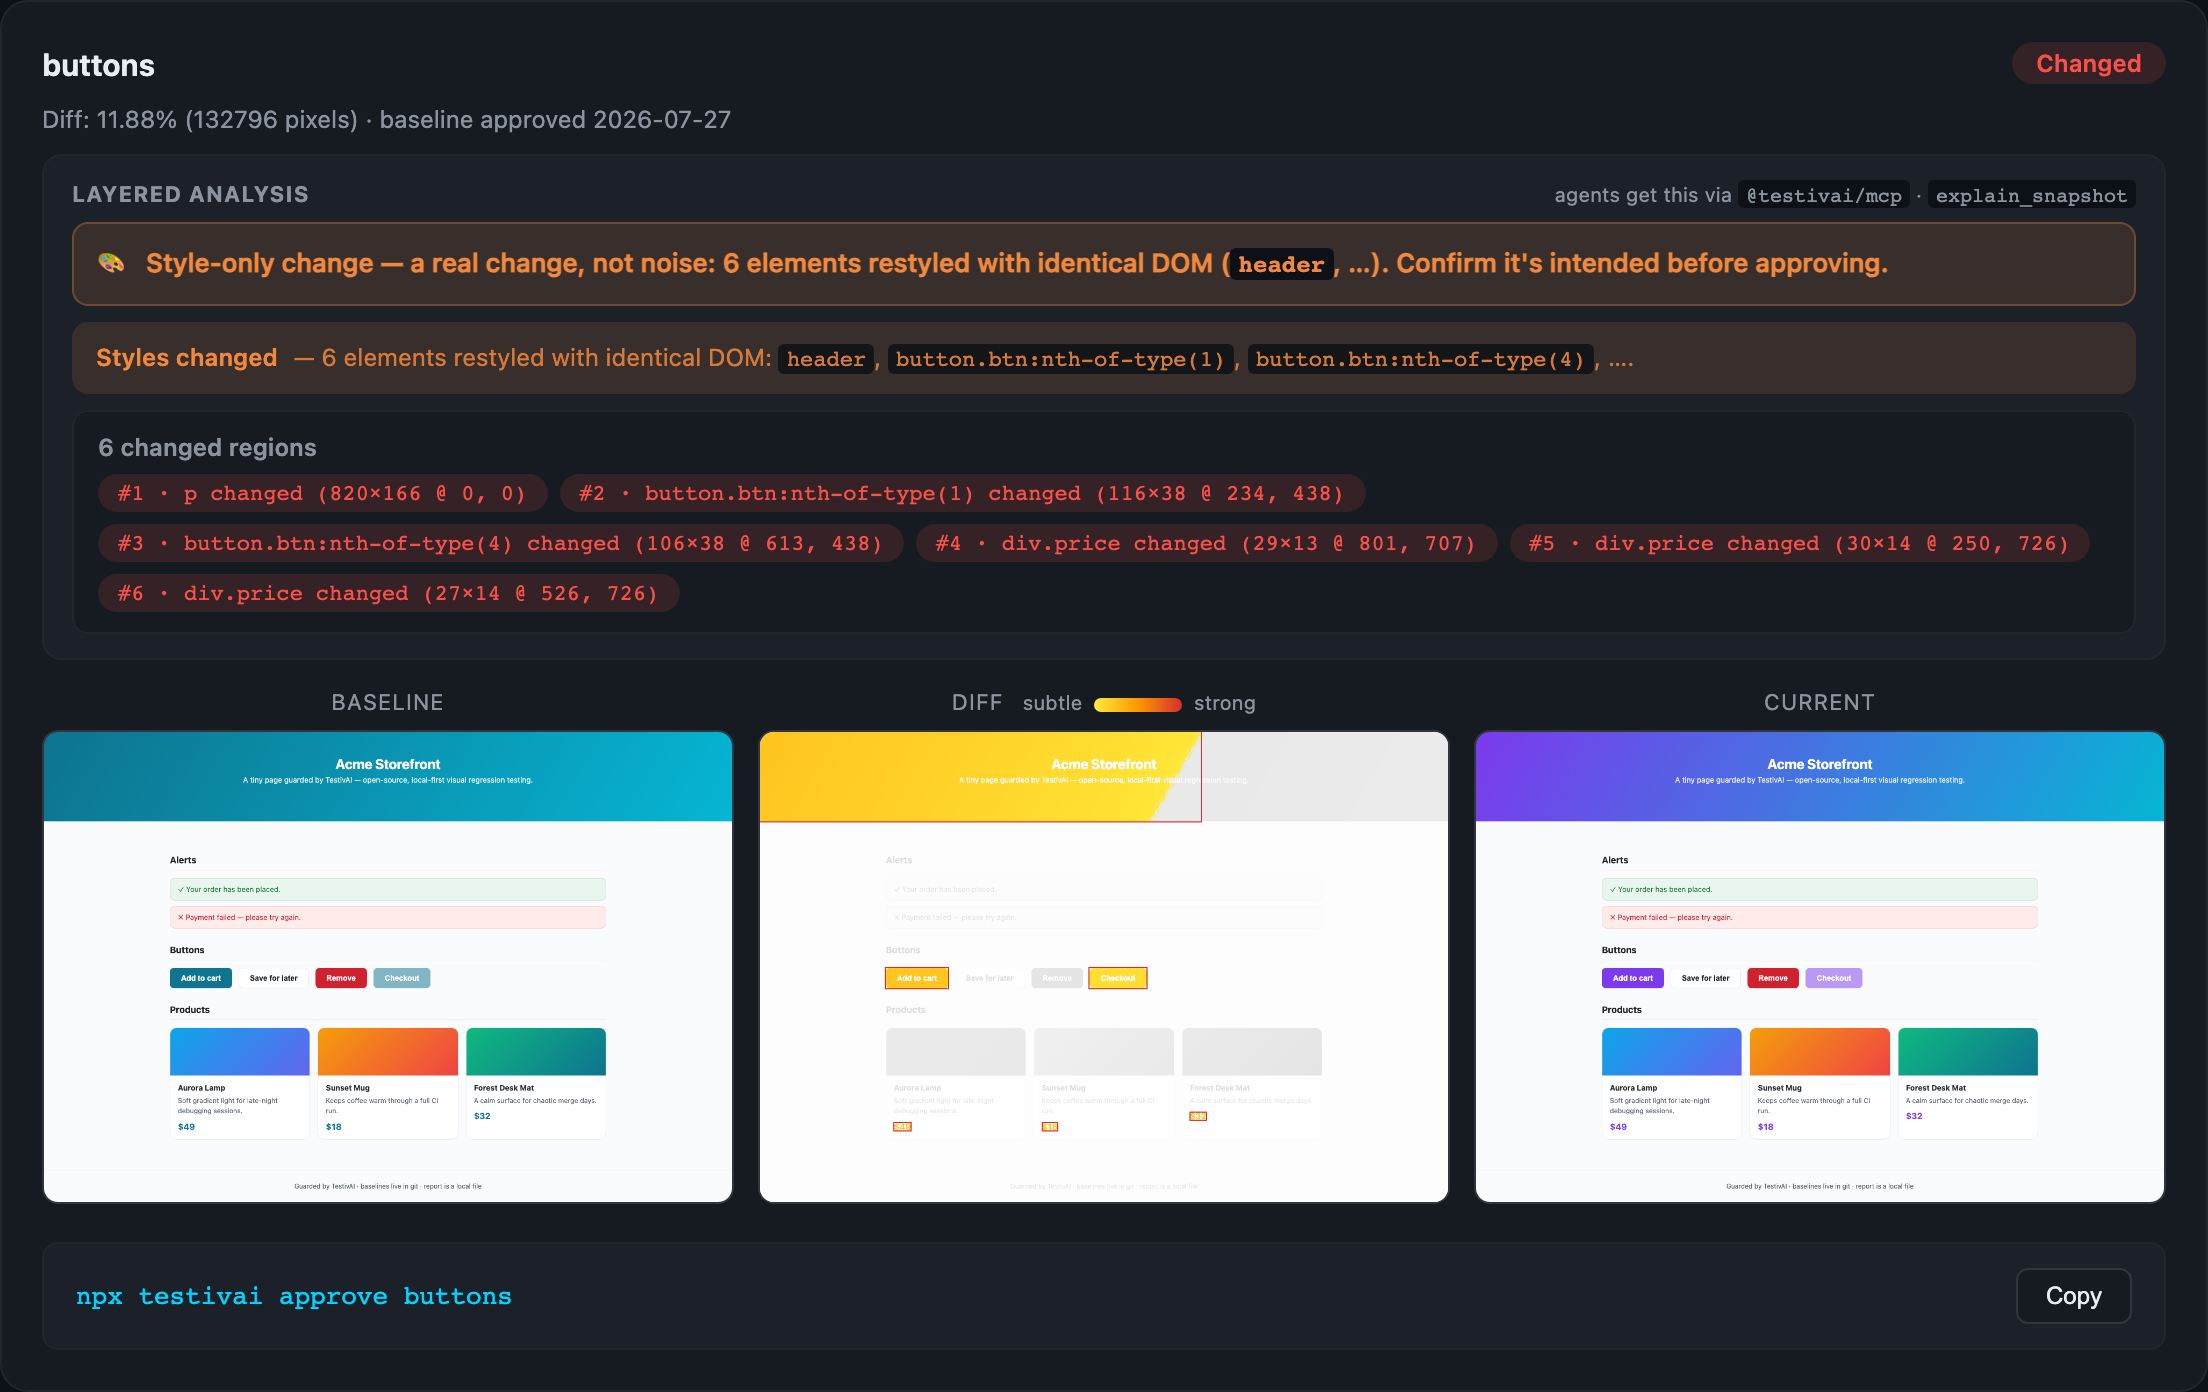
- DOM + style-aware noise hint — separates real changes from render jitter, and catches the stylesheet-only case: identical DOM with changed computed styles reads as "Styles changed on
button.cta", never as noise. - Auditable masks & region-level diffs — exclude dynamic areas (selectors or coordinates) with the masked region hatched in the diff, and get "3 changed regions" with bounding boxes instead of a raw pixel percentage.
- Element attribution & exact shift detection — the report names which element changed ("
div.card:nth-of-type(2)shifted +8px vertically — content unchanged") and spots the injected-banner case ("everything below y=80 moved +24px"), derived from layout, not pixel guesswork. No local-first tool does this. - First-class adapters — Playwright (TS/JS and Python, Java experimental) and WebdriverIO, using each framework's native APIs; every language shares one set of baselines and one report.
- Mobile web, no extra package — Playwright device emulation works through the same
witness()call: one project per device profile, baselines keyed per device automatically, and the DOM and computed-style attribution survives emulation, so a change behind a@mediaquery is caught on mobile and correctly passes on desktop. See the mobile web guide. - PR-native workflow — a GitHub Action posts the diff and approves baselines from a
/testivai approvecomment. - No lock-in — MIT license, baselines live in your git, and
results.jsonis a semver-governed public contract.
Evaluating this for a team? Maintenance & roadmap covers who builds it, the release cadence, and what happens to your setup if maintenance ever stops.
Already using Playwright's
toHaveScreenshot()? It's good, and if a pixel diff answers your question you should keep using it. Here's an honest look at what TestivAI adds and when it isn't worth the dependency.
Eyes for your coding agent
If an AI agent (Claude Code, Cursor, Copilot, …) writes your UI code, someone still has to check what the UI looks like — and it shouldn't be you, one screenshot at a time. TestivAI is built to be that check:
- No account, no API key, no network — an agent can run it inside any sandbox without you provisioning secrets.
- Machine-readable output — every run writes
visual-report/results.json(a semver-governed schema) with per-snapshot diff percentages and DOM change summaries, so an agent can read the result and self-correct. - Noise-aware verdicts — the DOM hint tells the agent whether a pixel diff is likely render noise or a real structural change (
2 added, 1 removed), so it doesn't chase anti-aliasing ghosts. - Explanations, bring-your-own-model — the MCP
explain_snapshottool hands your agent layered evidence (which selectors shifted vs changed, whole-page shift detection, style-only changes) and your model writes the narrative: "card #2 shifted +24px — likely the banner injected above it." No hosted AI service in the loop. - Human approval stays in the PR — the agent iterates locally; you approve baselines with one
/testivai approvecomment.
Paste this into your project's AGENTS.md / CLAUDE.md to wire it up (full guide with MCP setup, a real agent transcript, and the approval rule: docs/guides/ai-agents.md):
## Visual verification
After changing any UI code, run `npx playwright test` (TestivAI captures
screenshots automatically), then read `visual-report/results.json`.
- `status: "changed"` with `dom.changed: true` → describe the DOM summary and
  ask whether the change is intended before approving.
- `status: "changed"` with `dom.noiseHint: true` → likely render noise; mention
  it but don't block.
- Never run `testivai approve` yourself — baseline approval is a human decision.
Packages
Live versions are shown by the badges at the top of this README.
| Package | Description |
|---|---|
@testivai/witness | Core SDK: CLI, local diffing, baselines, HTML report generator |
@testivai/witness-playwright | Playwright reporter/adapter built on top of @testivai/witness |
@testivai/witness-webdriverio | WebdriverIO service + capture function (local mode) |
@testivai/witness-selenium | Selenium WebDriver capture adapter (Python/Java Selenium live in python/ and java/) |
@testivai/mcp | MCP server — visual results + diff images for AI coding agents |
testivai (PyPI) | Python adapter for playwright-python + pytest plugin — same baselines & report |
ai.testiv:testivai | Java adapter for playwright-java + JUnit 5 extension (experimental) |
testivai (RubyGems) | Ruby adapter for Capybara / RSpec / Cucumber — same baselines & report |
Plus:
action/— GitHub Action for PR-based visual approvalsexamples/— minimal real-world example projectsdocs/— public documentatione2e/— OSS smoke E2E test suite
No test suite? One command.
AI-built and vibe-coded apps (Lovable, Bolt, v0, ...) usually ship with zero tests. You still get the full safety net:
npx testivai witness http://localhost:3000
TestivAI launches a headless Chrome, discovers your pages (or takes
--pages "/,/pricing"), and captures each one — baselines, diffs, noise
hints, HTML report, and PR approvals all work exactly as below, no test
framework required. See the vibe-coded apps guide.
Quick Start (Playwright, Local Mode)
# 1. Install
npm install -D @testivai/witness-playwright @playwright/test
npx playwright install chromium
// 2. (OPTIONAL) Customize tolerances and report settings.
// Everything runs locally — no config needed.
// Only create this file if you want to tune threshold, reportDir, etc.
// File: .testivai/config.json
{
  "threshold": 0.1,            // per-pixel color sensitivity (0-1)
  "maxDiffPercent": 0,         // pass diffs at or below this % (your tolerance dial)
  "noiseAutoPass": false,      // true: DOM-identical diffs within noiseMaxDiffPercent pass
  "stabilize": true,           // freeze animations, hide caret, wait for fonts
  "ignoreSelectors": [],       // e.g. [".live-chat", "[data-testid=clock]"]
  "reportDir": "visual-report",
  "autoOpen": false
}
// 3. Wire the reporter — playwright.config.ts
import { defineConfig } from '@playwright/test';

export default defineConfig({
  reporter: [
    ['list'],
    ['@testivai/witness-playwright/reporter'],
  ],
});
// 4. Add a capture call — tests/example.spec.ts
import { test } from '@playwright/test';
import { testivai } from '@testivai/witness-playwright';

test('homepage looks correct', async ({ page }, testInfo) => {
  await page.goto('http://localhost:3000');
  await testivai.witness(page, testInfo, 'homepage');
});
# 5. Run
npx playwright test
First run: baselines are written to .testivai/baselines/.
Later runs: screenshots are diffed and a self-contained HTML report is written to ./visual-report/.
What you get out of the box (free, no account)
- Full-page screenshot capture via Playwright
- Stabilized captures by default — animations/transitions frozen, caret hidden, web fonts awaited (the top causes of flaky visual tests, neutralized before every screenshot)
- Local pixel diff with configurable threshold
- Tunable pass criteria —
maxDiffPercent/maxDiffPixelstolerances, plus opt-innoiseAutoPassso DOM-identical render noise stops demanding review ignoreSelectorsfor dynamic content (both adapters, global or per-snapshot)- Self-contained HTML report (
visual-report/index.html) - Machine-readable results (
visual-report/results.json) - Committed baselines under
.testivai/baselines/(justgit addthem)
CI Integration (GitHub Actions)
Copy this single workflow file into your repository. It handles both running the visual regression tests and processing /testivai approve commands from PR comments — no extra secrets, no external services required.
# .github/workflows/testivai-oss.yml
name: TestivAI OSS

on:
  pull_request:
    branches: [main]
  issue_comment:
    types: [created]        # listens for /testivai approve commands

permissions:
  contents: write           # approve action commits updated baselines to the branch
  pull-requests: write      # post PR diff comment
  statuses: write           # set pass/fail indicator on the PR

jobs:

  # Runs on every PR — captures screenshots, diffs against baselines, posts report
  visual-regression:
    name: Visual Regression (OSS)
    if: github.event_name == 'pull_request'
    runs-on: ubuntu-latest
    timeout-minutes: 15
    steps:
      - uses: actions/checkout@v4
      - uses: actions/setup-node@v4
        with: { node-version: '20', cache: 'npm' }
      - run: npm ci
      - run: npx playwright install chromium --with-deps
      - run: npm run build
      - run: npm run test:oss          # runs playwright.oss.config.ts

      - name: Post results + upload report
        uses: testivai/testivai-oss@v1
        if: always()
        with:
          github-token: ${{ secrets.GITHUB_TOKEN }}
          report-dir: visual-report   # where @testivai/witness writes results.json

  # Runs when a collaborator comments /testivai approve on the PR
  approve-baselines:
    name: Approve Baselines
    if: |
      github.event_name == 'issue_comment' &&
      github.event.issue.pull_request != null &&
      startsWith(github.event.comment.body, '/testivai')
    runs-on: ubuntu-latest
    timeout-minutes: 10
    steps:
      - uses: testivai/testivai-oss/approve@v1
        with:
          github-token: ${{ secrets.GITHUB_TOKEN }}
          workflow: testivai-oss.yml   # this file's name — used to find the report artifact
Approve changed baselines
After CI posts the diff report on your PR, review the testivai-visual-report artifact, then comment:
| Comment | Effect |
|---|---|
/testivai approve homepage | Approves one named snapshot |
/testivai approve --all | Approves every changed snapshot at once |
What happens:
- Action verifies you have write access to the repository (others get a polite rejection)
- Downloads the
testivai-visual-reportartifact from the latest CI run on your branch - Copies approved screenshots into
.testivai/baselines/and commits them to your PR branch - Posts a confirmation comment listing what was approved
- CI re-runs automatically — approved snapshots now pass
What the PR comment looks like
TestivAI Visual Report

4 passed | 2 changed | 1 new — 7 total

Changed Snapshots

▼ homepage — 12.34% different
  DOM unchanged — pixel diff is likely render noise (font hinting, anti-aliasing).

▼ dashboard — 8.91% different
  DOM changed — 2 added, 1 removed.
Real-World Example
A complete, minimal consumer project lives at testivai-example: a static page, three witness() calls, the PR /testivai approve flow, and a live report on Pages — all against the published packages.
Repository Layout
packages/
  witness/     @testivai/witness              — CLI, diff engine, baselines, report
  playwright/  @testivai/witness-playwright   — Playwright reporter + capture
  webdriverio/ @testivai/witness-webdriverio  — WebdriverIO service + capture
  selenium/    @testivai/witness-selenium     — Selenium adapter
  mcp/         @testivai/mcp                  — MCP server for AI agents
action/        GitHub Action for PR comments
approve/       GitHub Action for /testivai approve
examples/      framework-specific minimal examples
docs/          public documentation (Markdown)
e2e/           OSS smoke E2E
Development
# Prereqs: Node 20+, pnpm 10+
pnpm install
pnpm build       # tsc all packages
pnpm test        # unit tests across all packages
pnpm e2e         # smoke E2E
pnpm pack:dry    # validate publish artifacts
Contributing
Bug reports, feature requests, and PRs welcome. Please see:
Releases
Releases are published to npm under the latest dist-tag, with provenance
attestations. The flow is Changesets-driven: a PR that changes a published
package adds a changeset, merging it opens a "version packages" PR collecting
the pending bumps, and merging that publishes. See
.changeset/README.md for the contributor side and
.github/workflows/release.yml for the
workflow itself.
Attribution
This repository was extracted from the private TestivAI monorepo with a clean initial git history. Original development history is preserved internally; this public repository is the new source of truth for the SDKs going forward.
License
MIT — see LICENSE.
Installation
Source-derived launch command. Check the maintainer’s required arguments and credentials before running:
npx -y @testivai/mcpSet up in your AI client
Merge this template into ~/Library/Application Support/Claude/claude_desktop_config.json. Keep existing servers. Add any arguments, credentials, and permissions required by the maintainer; this template has not been install-tested.
{
  "mcpServers": {
    "ai-testiv-mcp": {
      "command": "npx",
      "args": [
        "-y",
        "@testivai/mcp"
      ]
    }
  }
}
Restart Claude Desktop completely for changes to take effect. Confirm the server appears connected in the client’s tool list, then try a read-only example from its documentation.
Claude Desktop setup referencePackage
Compatible MCP Clients
ai.testiv/mcp works with any MCP-compatible client. Copy the config snippet from the Configuration section above and add it to the file shown for your client, then restart the application.
- Claude Desktop
~/Library/Application Support/Claude/claude_desktop_config.jsonRestart Claude Desktop completely for changes to take effect. - Cursor
~/.cursor/mcp.jsonRestart Cursor for changes to take effect. - VS Code
.vscode/mcp.jsonReload VS Code window for changes to take effect. - Windsurf
~/.codeium/windsurf/mcp_config.jsonRestart Windsurf for changes to take effect. - Claude Code
.mcp.jsonSave at the project root, then start Claude Code in that project and review the MCP server approval prompt. Keep real credentials out of shared files.